
I'm fortunate to have spent the last few years either working from home or travelling the World doing training, consultancy and public speaking. With the recent Coronavirus epidemic having quite literally wiped my travel schedule clean, I find myself doing a lot more working from home and imagine others may too. In this post I'm going to look at a few steps to boost the security of my home network using the Unifi Security Gateway. You may not have the exact same hardware as me, but the principles will translate into other hardware setups too.
Your home WiFi
Often used for streaming, a bit of Xbox and catching up on your favourite Apple Music playlists, the typical home WiFi might be in for a bit of a shock over the coming weeks! As many of us pile new devices onto our WiFi and start working from home, I stopped to take a look at my home network to see if there were any easy wins in terms of improving security.
My home network
Just a couple of days ago I wrote a blog post about Pumping up your internet speeds with the Unifi Security Gateway and 4G/5G and how I've improved the speed and reliability of my Internet connection at home. Now that I'm using it a lot more and depending on it for 100% of my work, those are both really important things to improve. I already know the security of my home network is pretty solid because I spent a good amount of time working on it, but I wanted to cover a couple of basics for anyone out there who might want to do the same.
Boy is my wife going to be mad at @troyhunt when she gets home... 😂 pic.twitter.com/Xe465BQatn
— Scott Helme (@Scott_Helme) November 28, 2016
The game plan
I have some basic points outlined below and we'll look at each of them one by one. You can complete each step if possible on your network setup or skip them if you don't want to do them.
- Use a good password
- Create a separate WiFi network
- Create a VLAN to isolate devices
- Update all of your hardware
Use a good password
Yes, there I said it! You really should use a good password on your WiFi network. If you've spent the last 5 years handing out your password to everyone you know including the neighbour's dog, now might be a great time to change it and set it to something strong.
It doesn't have to be a wild jumble of 64 random characters, although that'd be great and you might be able to do that in just a second, as you might find yourself typing this in to a thermostat, a TV using the remote control or your fridge (seriously). As a result I'd suggest a selection of 4 words separated by a character of your choice. So the password could be something like dog-kettle-house-field (but please don't use that as your password!). This is certainly good enough for the basics and changing it from the default password if you're still using that is always a good plan.
Create a separate WiFi network
A lot of home routers can do this nowadays and it's a really good way to further improve the security of things at home. The way I have this setup is I have one WiFi network for my own trusted devices, like my laptop, iPad, phone, etc..., and I have a guest network that everything else goes on, including all of my IoT stuff and streaming devices.

With the Unifi Security Gateway (USG) this is super easy to do. Head over to Settings, search for WiFi Networks and click Create New WiFi Network.
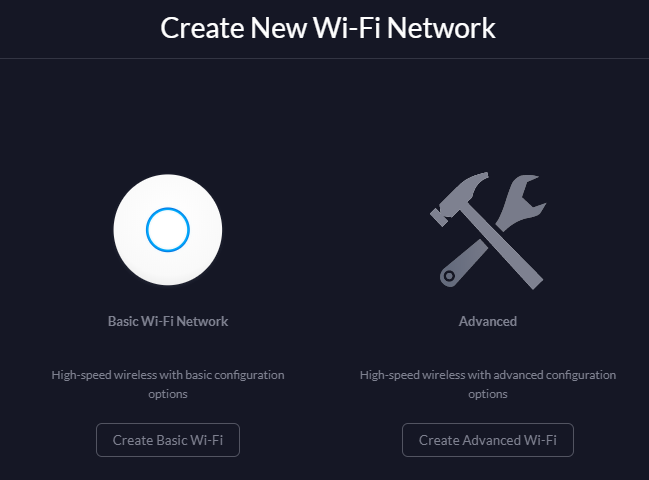
From this menu select Create Advanced WiFi (of course!) and then give the network a cool Name, strong Password and turn on Guest Policies.

Click Done and your network will be visible in just a few seconds! Now, when you change the password on your main WiFi and you're reconnecting devices, you want to put 'less trusted' devices onto the new guest network and put your 'more trusted' devices back onto the main network. From now on, when you have guests over, let them use your guest network instead of the main network. This also means you can have a slightly easier-to-type password on the guest WiFi and a ridiculously massive password on the main WiFi!
The default Guest Policies restrictions on the USG are a good starting point and if you're on a different device you want to see if there's a similar option to indicate that the second WiFi network is for guests or less trusted parties. Having this first layer of separation between the two WiFi networks is good, but I'm going a little further on the USG.
Using a VLAN
A Virtual-LAN is a way of breaking up your network with slightly harder boundaries and may or may not be something that your router or other devices support. If you're using UniFi hardware like I am then you should be all set to go. The first step is to go to Settings, search for Local Network and click Create New Local Network.
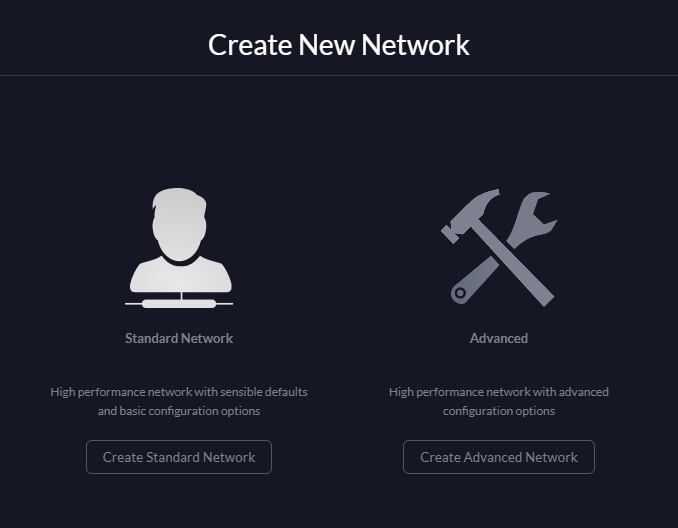
Click Create Advanced Network and then fill out a Name, make sure the Network Purpose is set to Guest, give it a VLAN ID of 2 or higher if that's already taken and click Done.
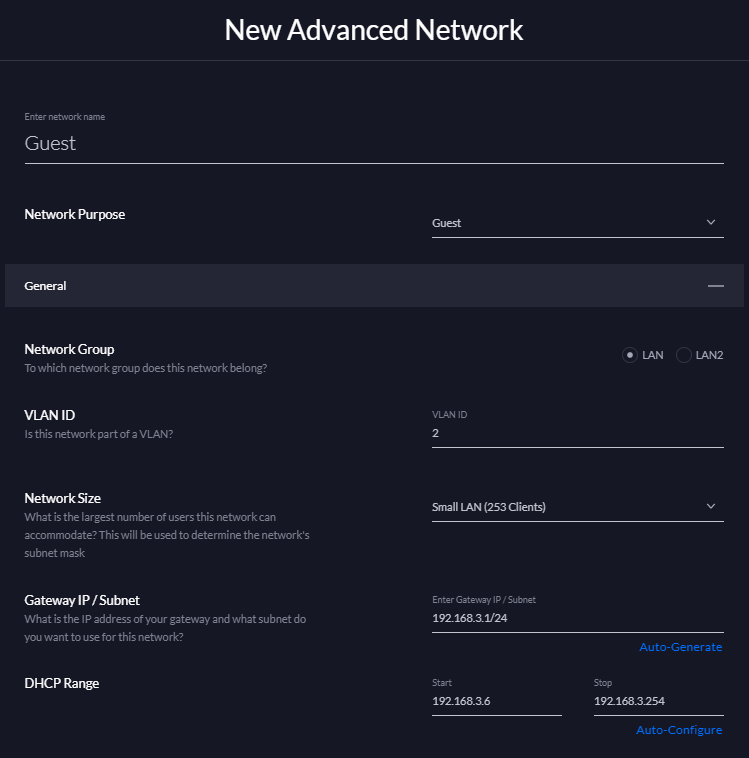
If you created a guest Wifi network in the previous step you can go back and edit it, select Use a VLAN and then set the VLAN ID to 2 and click Done.

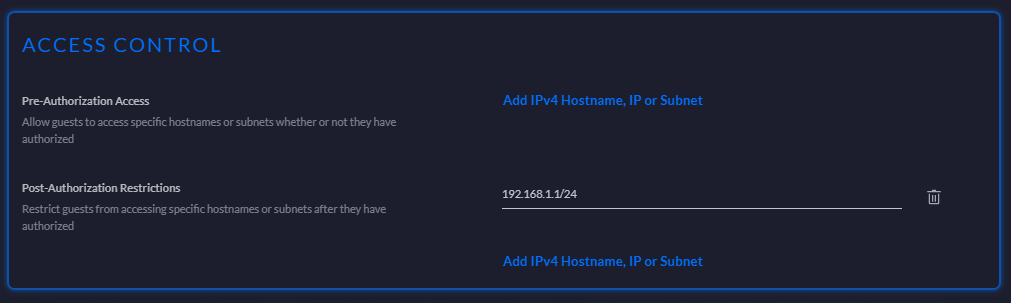
Once that's done the last step is to prevent devices on the guest network from talking to devices on the main network so go to Settings, search for Guest Control and then select the Access Control section. For Pre-Authorization Access you don't want to allow the guest network to talk to anything and for Post-Authorization Restrictions you want to add the IP range for your main network which will be 192.168.1.1/24 unless you've changed it. This means that devices on the guest network can no longer talk to devices on your main network at any time.
Advanced VLAN config
In the above section we created a second network that was park of a VLAN and set our guest WiFi network to use that, meaning any devices on the guest WiFi are now subject to the restrictions we setup. What won't be subject to those restrictions though is devices connected directly into a switch via a cable. With the managed UniFi switches I'm running, you can assign individual switch ports to be part of a VLAN and segregate devices off! Look at my Philips Hue Hub here as an example.
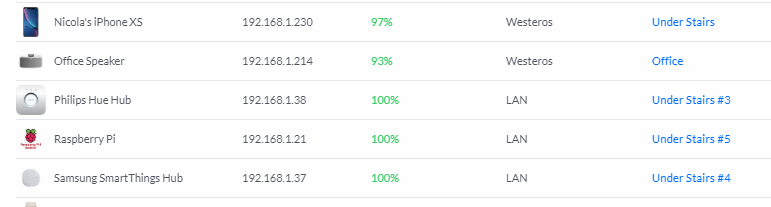
It's plugged in to the switch in my cabinet under the stairs on port #3 but is connected to the LAN network which is my main LAN. If I click on the switch port number it opens up the settings window for the switch.
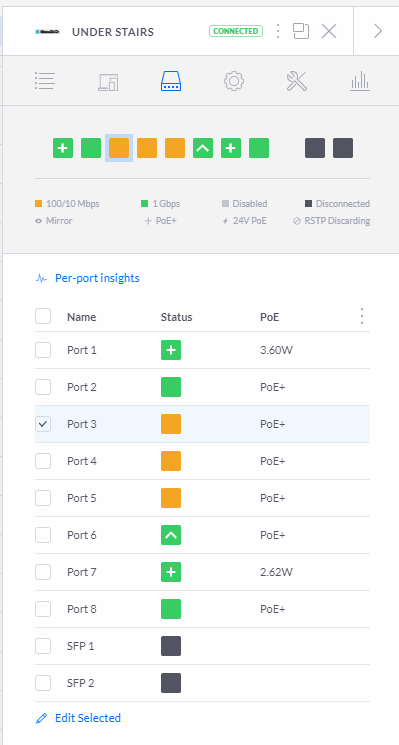
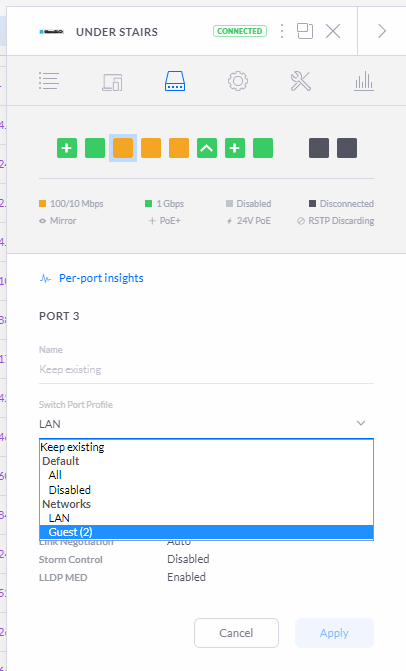
From here I can change the port to use the guest network instead of the main network and apply the settings.
Give it a few seconds to update the switch and you will then see the device is now connected to the guest network instead.
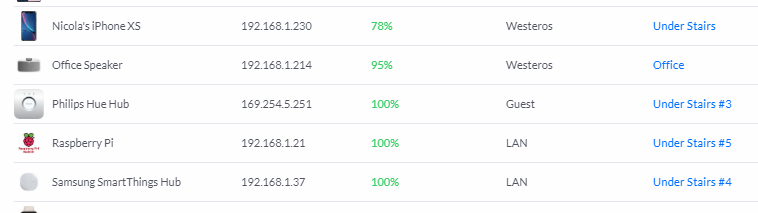
You can do the same for any other wired device that you want to be segregated but beware of doing this to all devices without thinking about if it will have an impact on how you use them. Take my Philips Hue Hub that I've just changed as an example, it now always connects as a 'remote' connection.
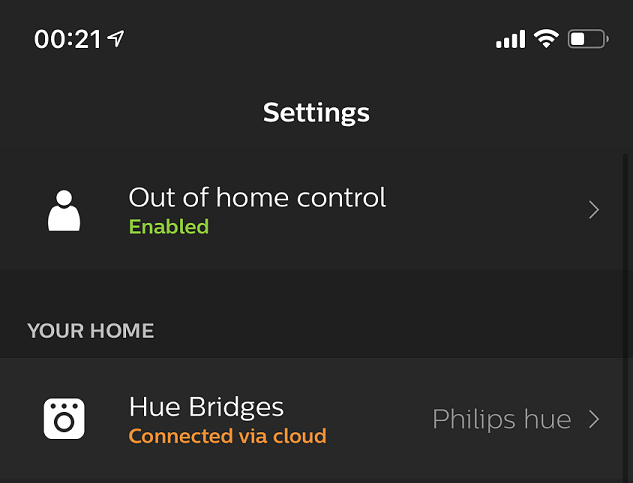
Because the device is now on the guest network and is isolated from my phone on the main network, the only way to communicate with the hub is via the cloud and not directly as you would before. This is the reason my Apple TV and AudioPro speakers are still on my main WiFi and not the guest WiFi, because I want AirPlay to work!

Even with these restrictions though you should be OK putting almost all devices onto the guest network. All of my smart TV and streaming devices are on there because all they need is Internet connectivity and not access to anything local on my main network.
Update all of your hardware
Updates are really important because they give you new features that may have been added to your device and fix security issues that have been found with the device. Managing updates on the UniFi hardware is really easy, you just head over to the Devices window and if there's an update for any of your devices, you hit the update button!
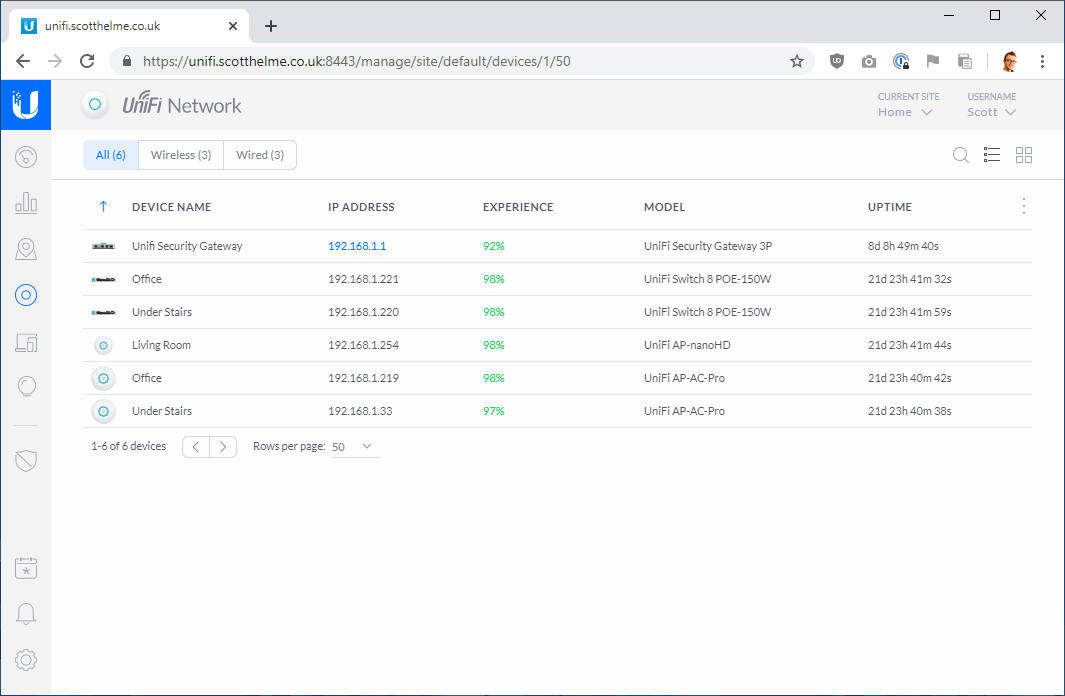
If you're running on different hardware then login and look around the menu system to find any option to check for and install updates. Keeping your stuff updated is always a good idea and goes for all of your devices too, not just your network equipment.
Bonus round! Stop hogging my bandwidth
So, you're working from home and the kids are keeping themselves quiet by streaming Netflix, YouTube and generally hogging all of your Internet bandwidth. This isn't so great whilst you're trying to work and you need reliably fast access (remember the post I linked at the beginning about speed?). Fortunately, there's a solution! We can implement some bandwidth restrictions on the guest network so that it can't hog all of the available bandwidth and we can make sure there's plenty left for us to use. Go to Settings, search for Client Groups and click Create Client Group. Give the new group a name, like Guest, and then set some reasonable bandwidth limits based on your available bandwidth.
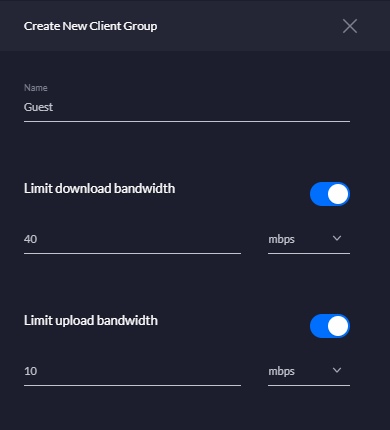
My connection can do ~80Mbps down and ~20Mbps up so I've set the limit on the Guest group to be half of that at 40Mbps and 10MBps, which should leave plenty for me. Click Apply and the new Client Group should be ready to use.

Now the Client Group is ready, you need to tell the guest WiFi network to use it so head back over there, edit the network and scroll down to find Client Group. You can now set your new guest Client Group and click Apply Changes.

This means that all of those pesky devices on the WiFi can't soak up all of your bandwidth and there should always be plenty for you to play with, leaving just wired devices to take care of. If you have wired devices that we segregated off onto the VLAN earlier, you need to add the Client Group to those too so they are subject to the same restrictions. Simply head over to your Clients list, select the device and on the Settings page, choose the new Guest group from the User Group drop down menu.
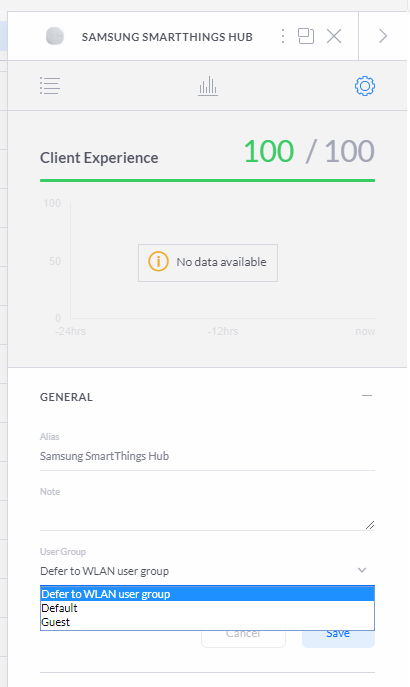
These wired devices will now have the same bandwidth restrictions applied so they too are prevented from soaking up all of your bandwidth!
Enjoy your dedicated bandwidth!
With this new setup I can always rely on having a good amount of bandwidth available to me while I'm working and nothing can slow me down. If the kids are really hammering the bandwidth on the guest network they may seem some extra buffering due to their new restrictions, but depending on your connection speed it may not even be a problem. You can now dial in to all of those remote events, like the Cyber-Broken event that Troy and I are hosting soon, and not worry about jittery video or poor quality audio! Enjoy!