
There's a new feature in Chrome Dev Tools that's going to make it easier than ever to get started with Security Headers like Content Security Policy! Let's take a look at how to override HTTP Response Headers and build a basic CSP in just a few minutes.
Override HTTP Response Headers
The feature that I'm going to be showing here is available in Chrome 113, which at the time of writing I was testing in Beta, but is now available in stable so check if you have an update available. Your Chrome version needs to be >= 113 for the feature I'm showing.
One of the great things about this new functionality in Dev Tools is that not only can you override the value of HTTP Response Headers that exist, you can also set entirely new HTTP Response Headers that don't exist to test out what effect they will have. This is going to make testing certain Security Headers even easier, like Permissions Policy, Cross Origin Embedder Policy and Cross Origin Opener Policy and of course, Content Security Policy. All of these headers do have safe modes for testing, where you can deploy these headers and they won't take any blocking action, and instead provide feedback on what blocking action they would cause, if any. That approach is great, and as I say it makes testing them totally safe, but you will still have to deploy them somehow. This may only be a single line of server config, application code or a tweak in your CDN settings somewhere, but it's a step you need to take nonetheless. Now, you can do really extensive testing of these Security Headers (and more!) from the comfort of your own browser.
Creating an override
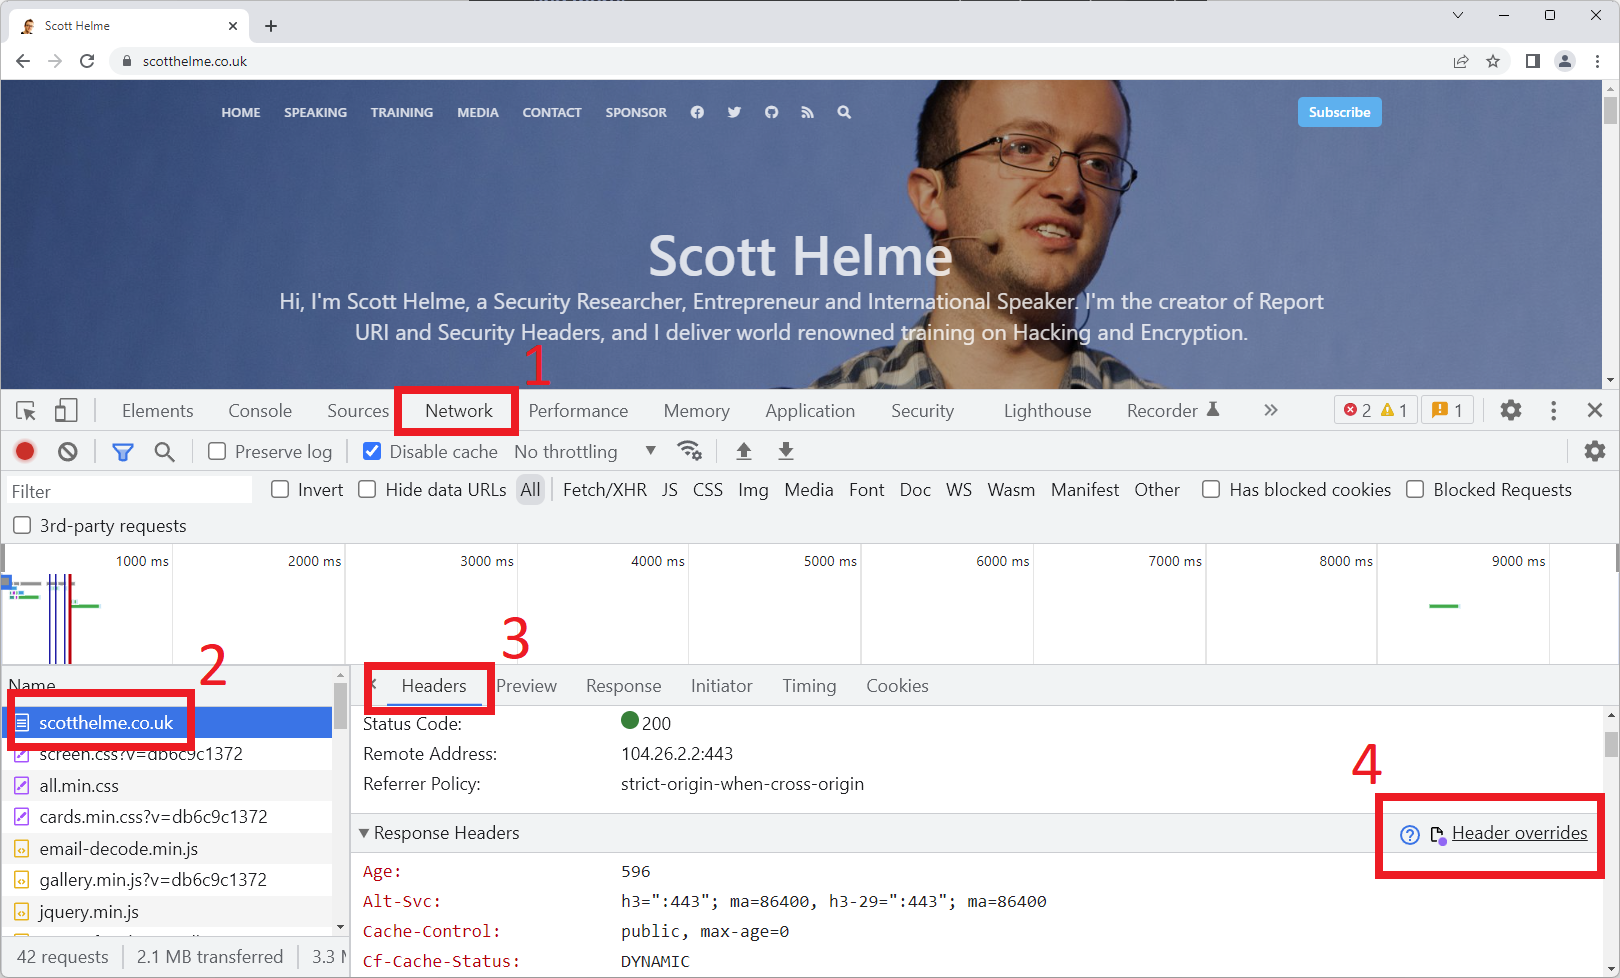
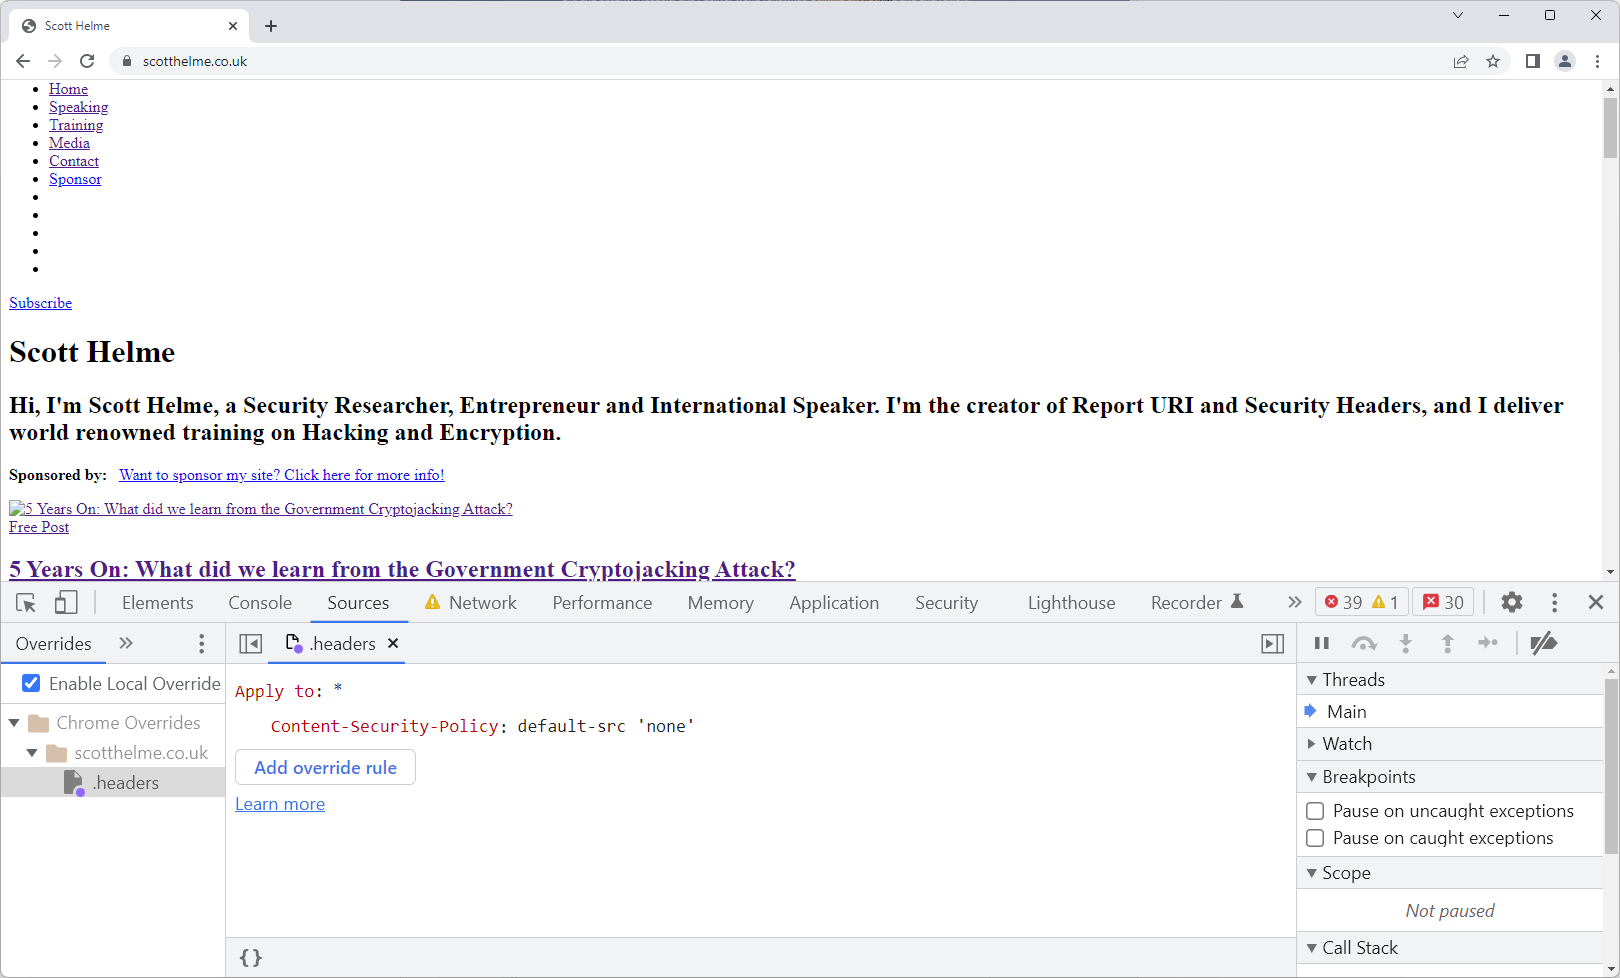
For the purposes of this demo, I'm going to be using my own personal site to deploy a Content Security Policy header so I can do some easy testing. Open the site you want to work with, open Dev Tools and head to the Network tab. Once there, find the network request for the page load, click it to open the details, click Headers, and scroll to the Response Headers section. Here, you will see the new 'Header overrides' option.
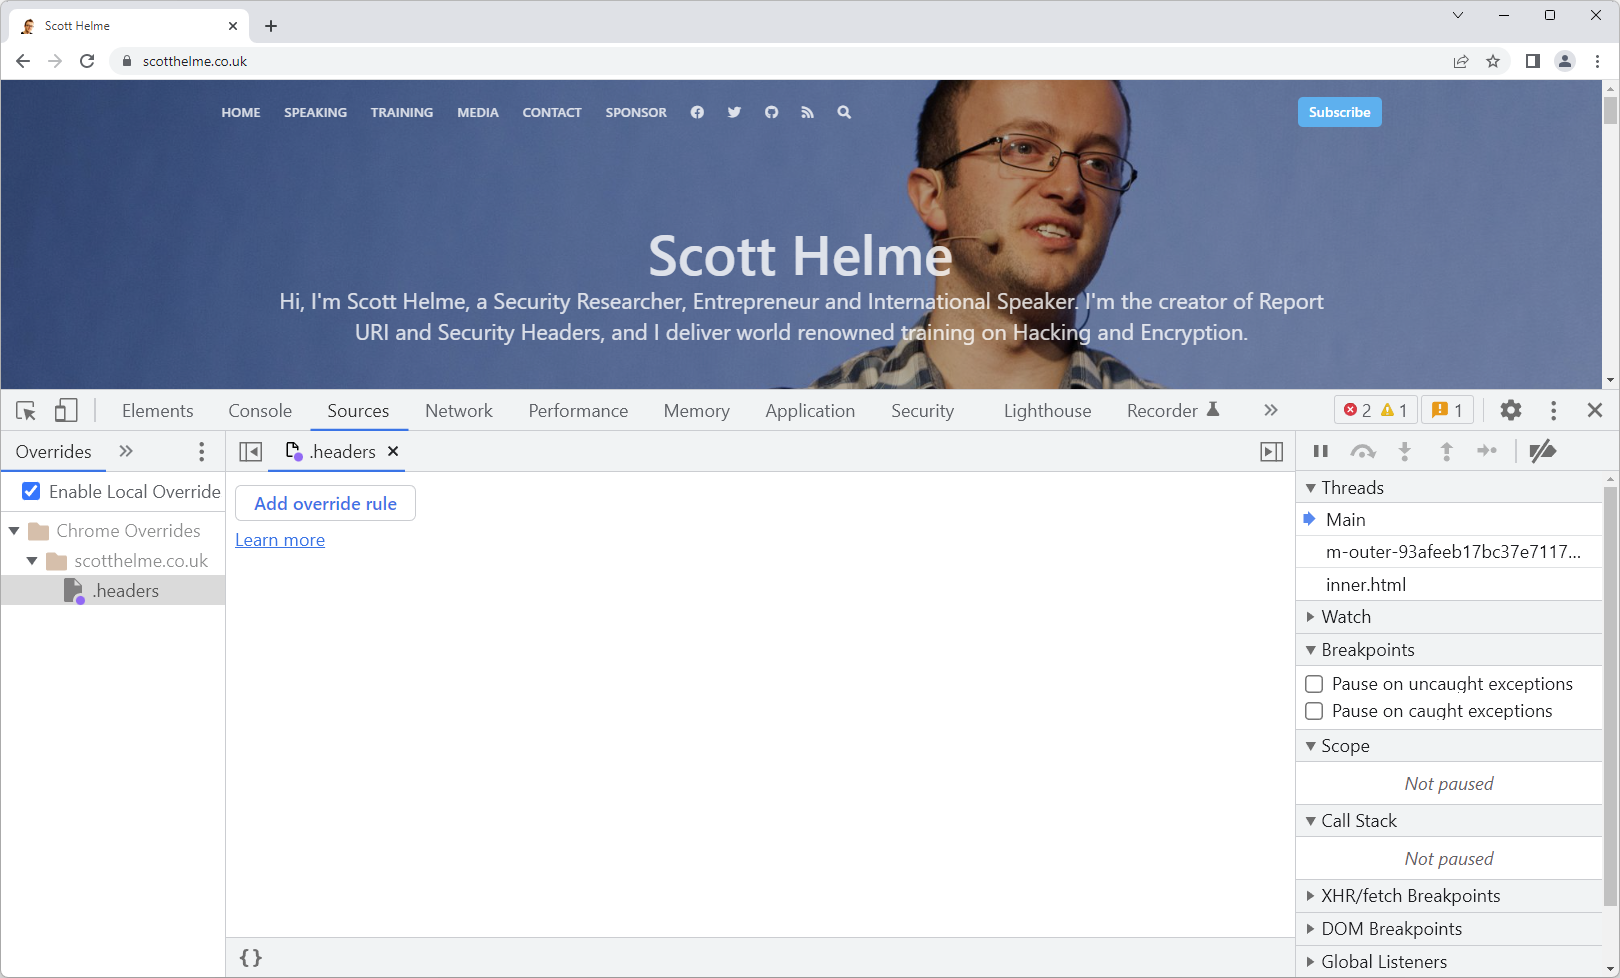
That will prompt you to create an overrides file, so look for the banner near the top of the browser to give Chrome a location and permission to store the file. Once done, it will take you to the Sources tab where you can view your overrides file and you can edit it to specify your override rules.
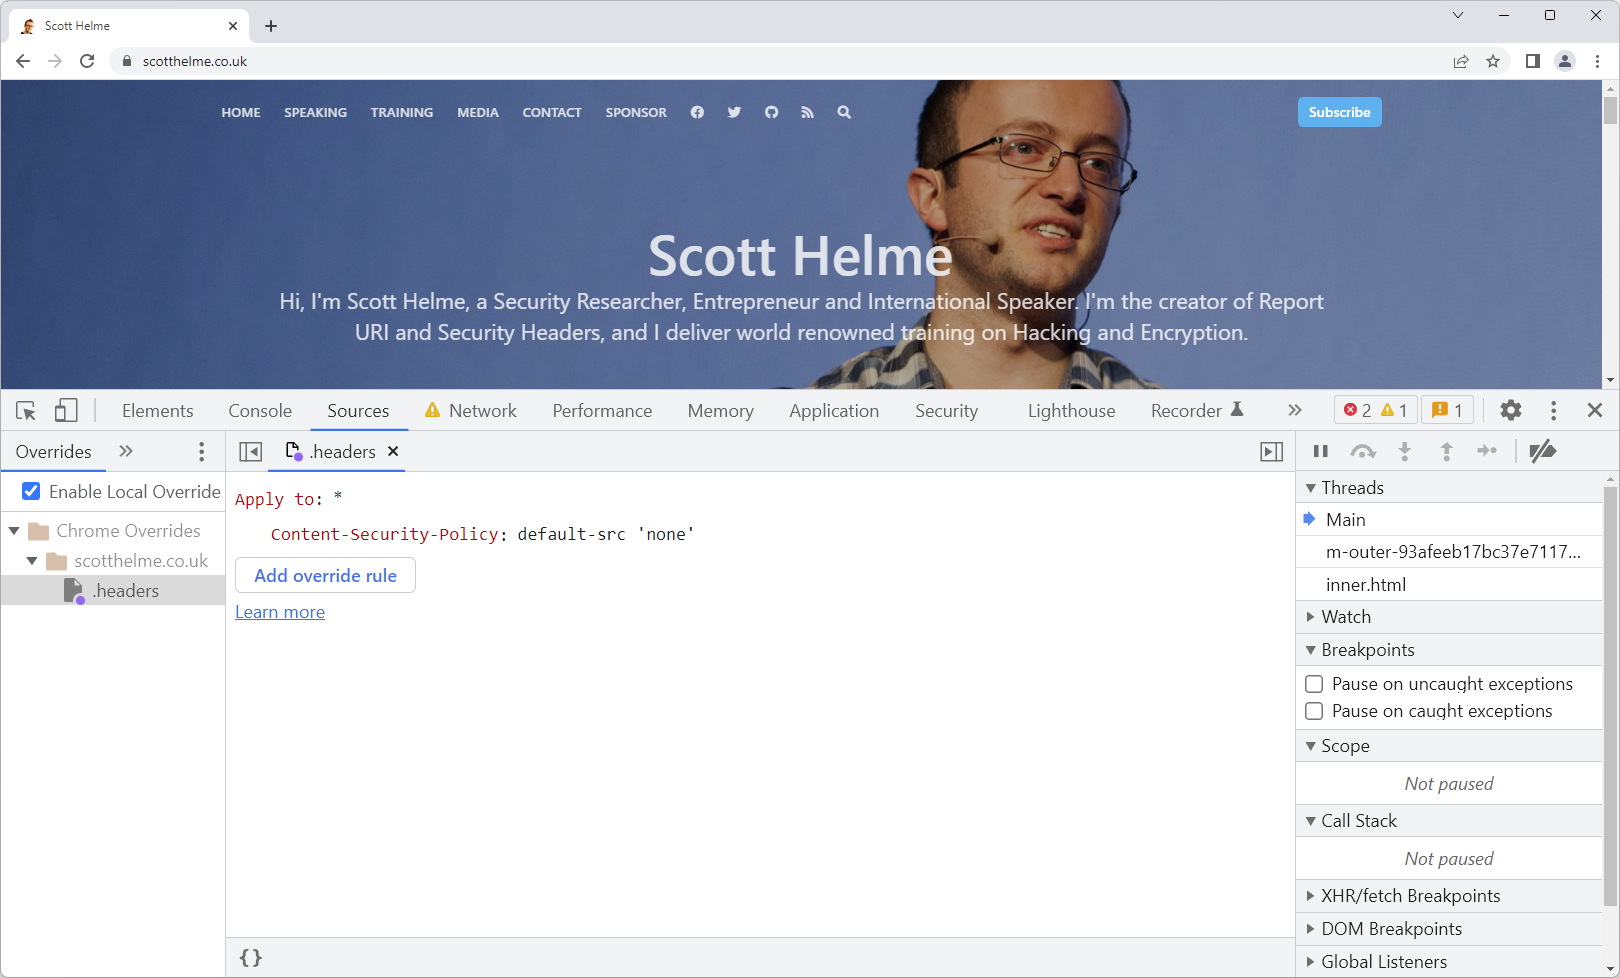
I'm going to 'Add override rule' and then add my basic CSP header which would typically make a real mess of the page!
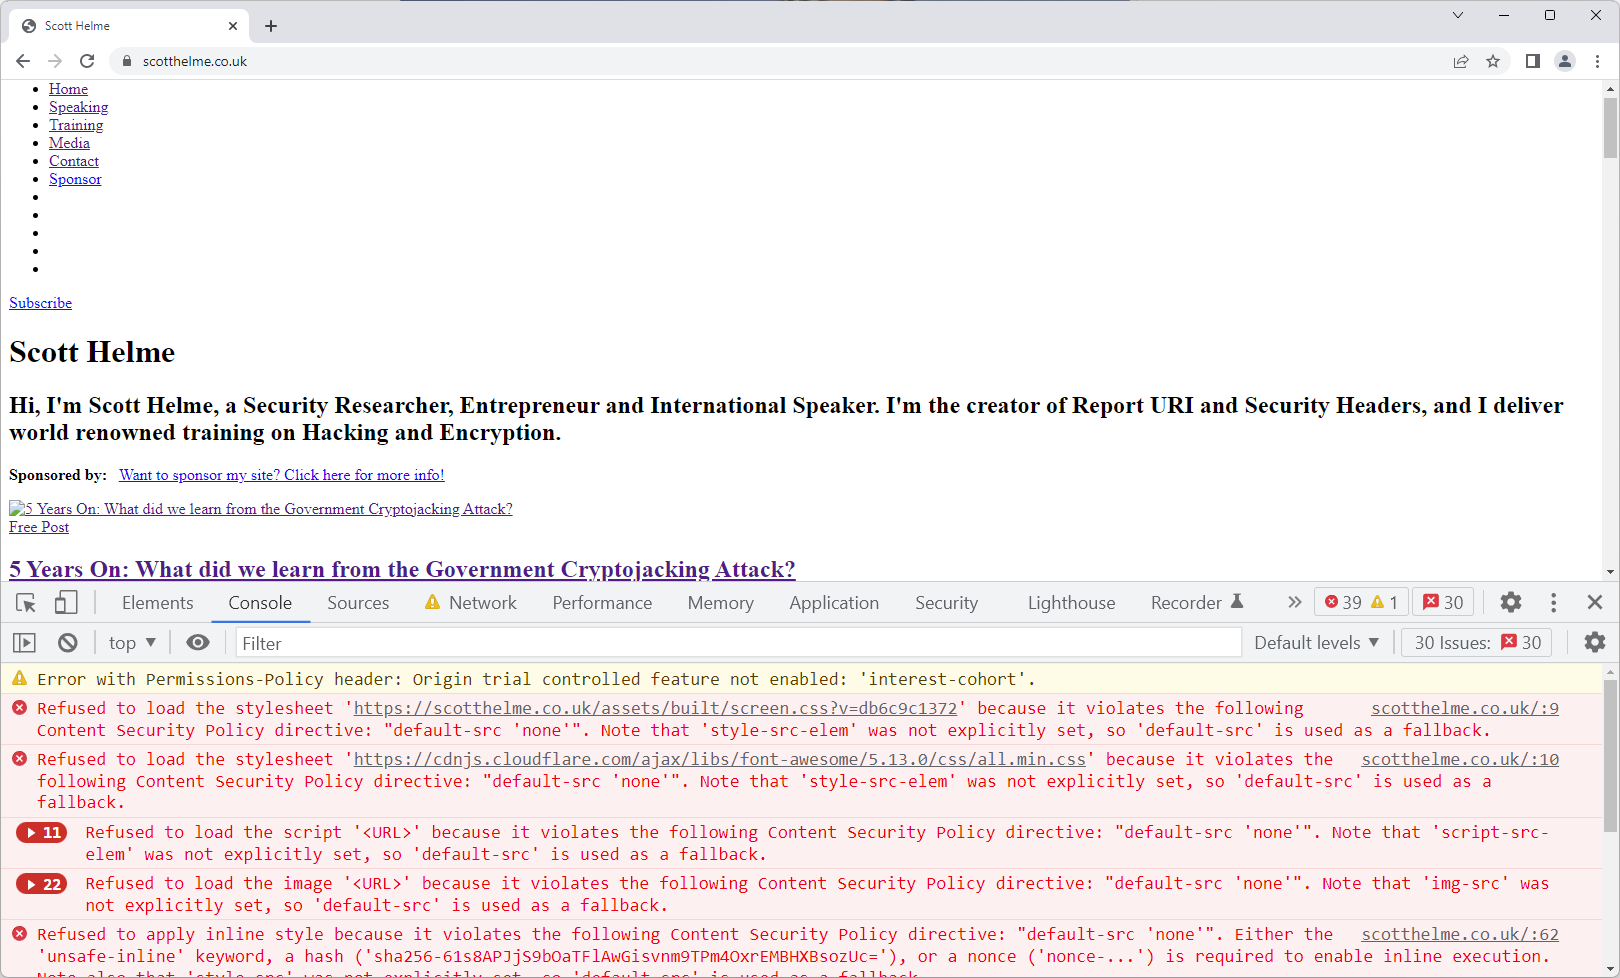
We can now refresh the page and the override rule be active, resulting in, as you'd expect, almost everything on the page being blocked with the associated errors showing up in the Console.
Because the override rule is only being enforced locally on my client, this is a really safe way of seeing exactly what would happen given a particular configuration of your CSP or other Security Headers. What's even better is that the browser will behave exactly as it would behave if that header came from the server, which means all of the features of CSP are available to you, including sending reports!

Creating a CSP the easy way
It was 5 years ago now when we introduced the CSP Wizard on Report URI. The CSP Wizard takes your CSP reports and allows you to build a policy by looking at the items that are present on your site. Looking at the documentation, you can see that a simple CSP-Report-Only header is required.
Content-Security-Policy-Report-Only: default-src 'none'; form-action 'none'; frame-ancestors 'none'; report-uri https://{subdomain}.report-uri.com/r/d/csp/wizard
This policy won't block anything and break the page, because it's in Report-Only mode, but it will cause a report to be sent for every item on the page. That information, the reporting of every asset on the page, is what allows you to quickly and easily audit all of resources loading across your site. Typically, this header would need to be deployed into production, but now, we can deploy it locally and get a huge amount of feedback in just a few seconds.
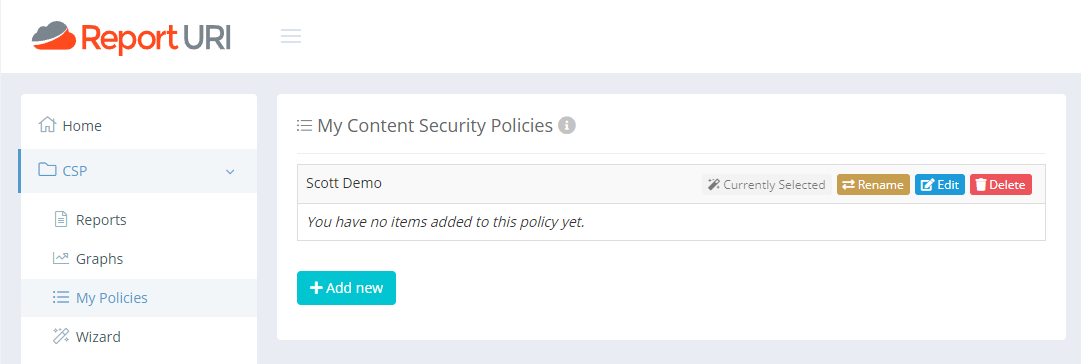
In the My Policies section of Report URI, I'm going to create a new policy called "Scott Demo" and enable the Wizard.
From the Setup page I can get my unique reporting address that will need to be used in my CSPRO header, and then I'm good to update the header override with the new values.
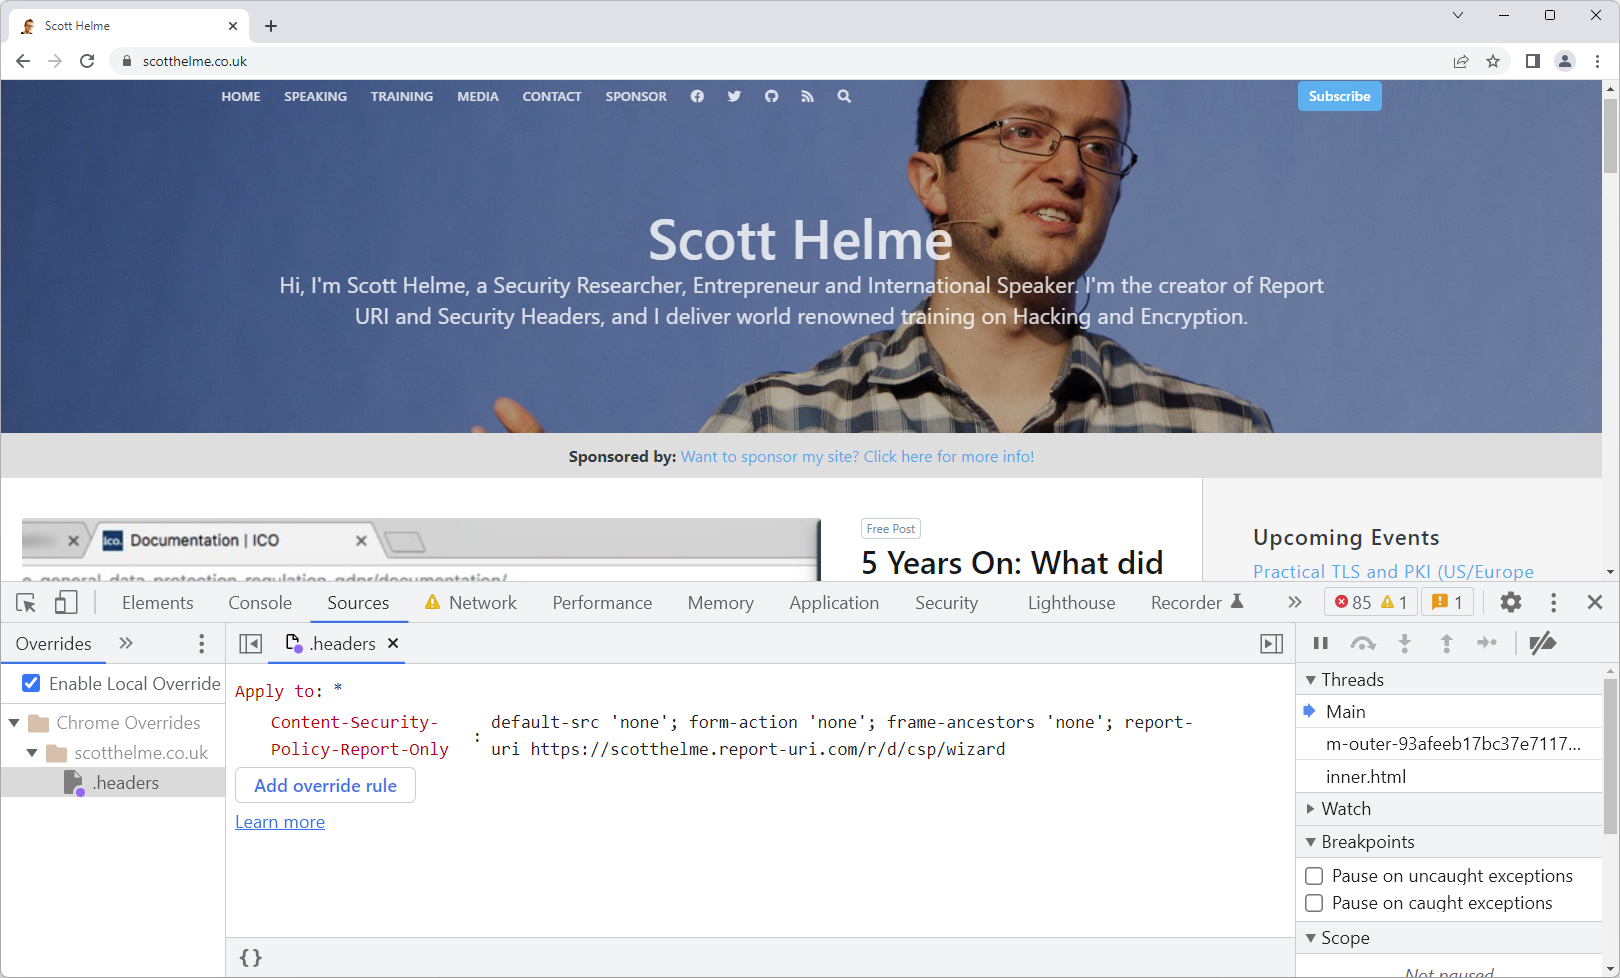
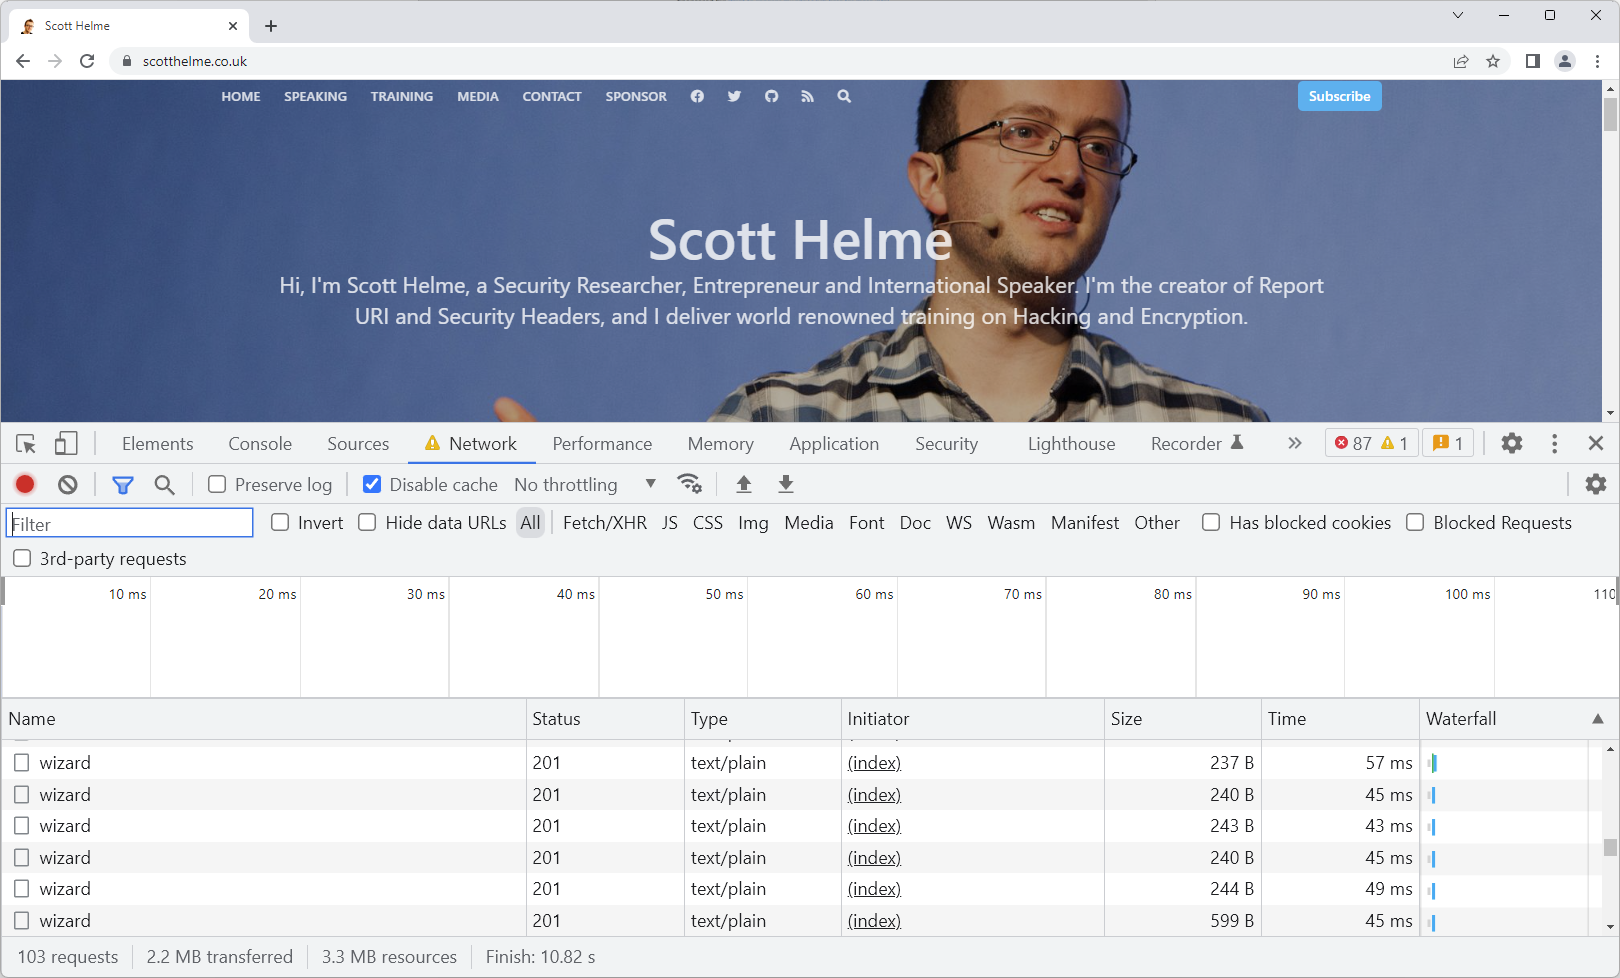
As you can see, the page is back to normal now because the CSPRO header doesn't cause anything to be blocked, but the console is still indicating all of those CSP errors.

The crucial part here is the CSP reports have been sent as the report-uri directive was set, and you can see the reports in the Network tab.
All I have to do now is head over to the CSP Wizard page and I can see all of the new items that have been detected and need my attention. From here, it's a simple case of deciding if each item is supposed to be there, in which case I can select the item and add it to my CSP, or, if it's not supposed to be there, I select it and block it, meaning it won't be added to my CSP.
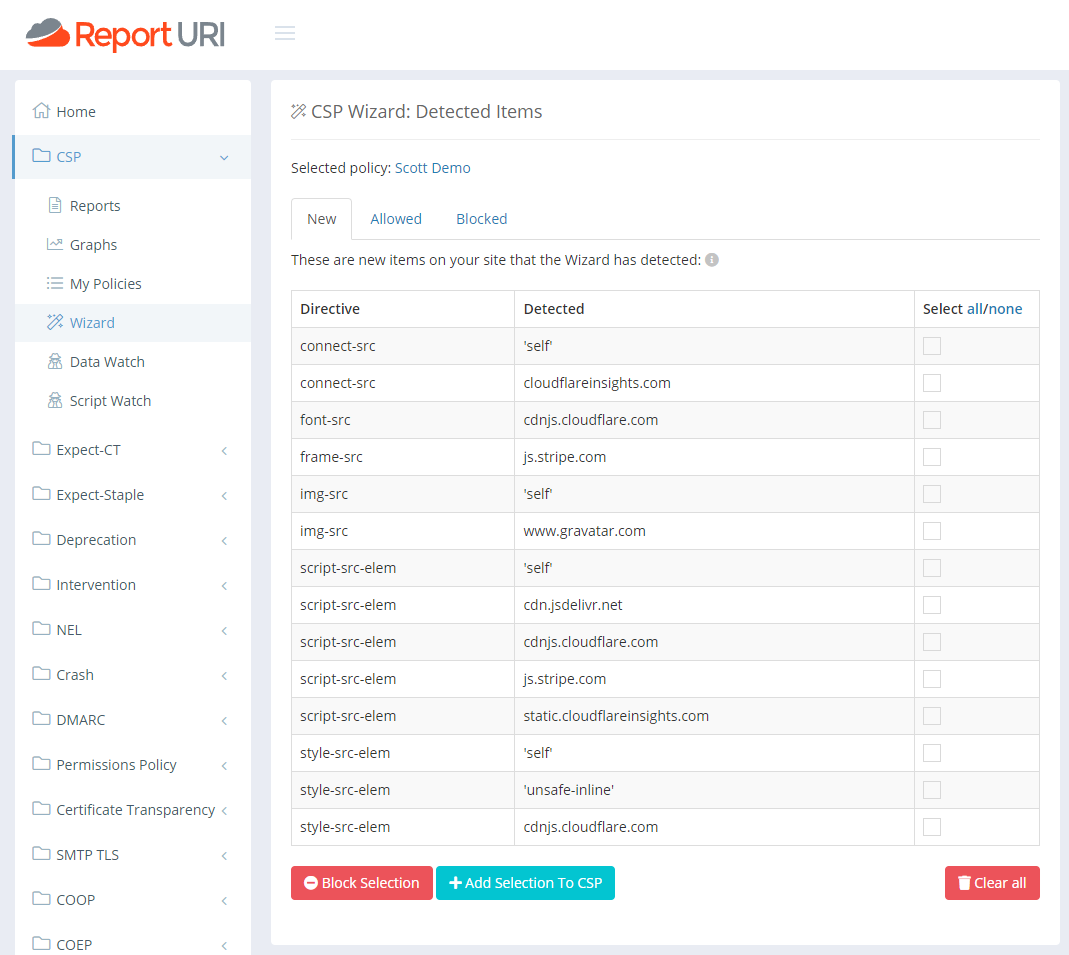
You'll need to click around a few pages on your site to make sure you're exercising all of the functionality, and by just skipping around a few pages, I managed to get a few more items reported. For example, my Disqus comment system only loads on blog posts and doesn't load on the homepage, for obvious reasons. I also only have YouTube videos embedded in certain blog posts so only those pages would report them. This is why we generally advise to deploy the CSP Wizard in production for a day or so, but in just a few seconds, I've gathered a heap of feedback about the resources on my site.
After approving the appropriate entries in the CSP Wizard, I now have the following in My Policies:
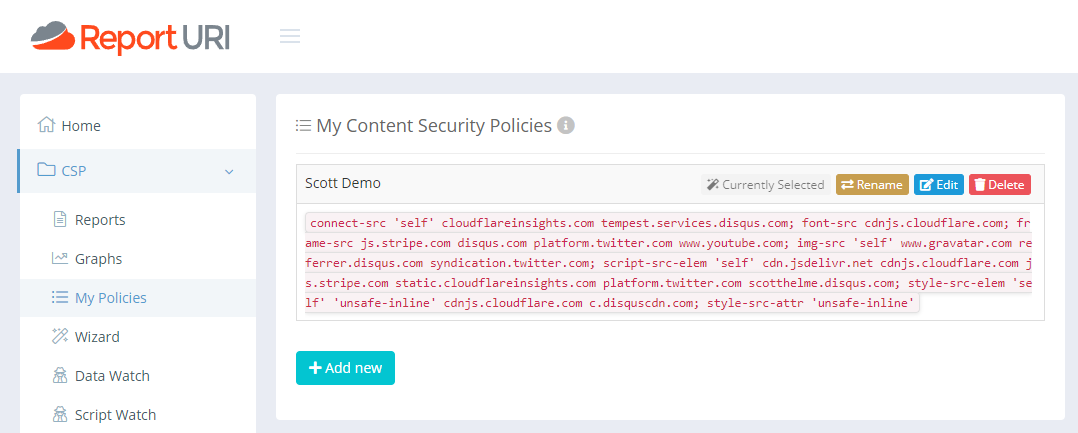
This is already a good chunk of the way towards generating a viable policy to use on my site. What I'd do now is replace the policy in the header override rule with the one above, so those items are no longer being reported, reducing the volume of reports being sent, and continue browsing around. Eventually, you would be best deploying this onto the live site, but the majority of the work has now been done in just a few minutes locally.
I think these header overrides are going to be really useful for people to play around with and test features like CSP without having to get their hands too dirty to start with. If you want to give the CSP Wizard a go, or try out any of our many features, you can sign up for a 30-day free trial over at Report URI to get started!